Hello all! Operation: Blackout is now out on Club Penguin Rewritten! Let's review it!
Here's what you need to do in order to save the Penguin Island:
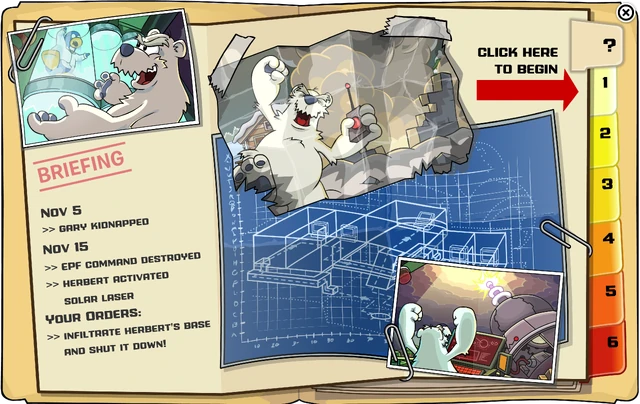
Mission 1
In order to infiltrate Herbert's base, you'll first need to put on a disguise.
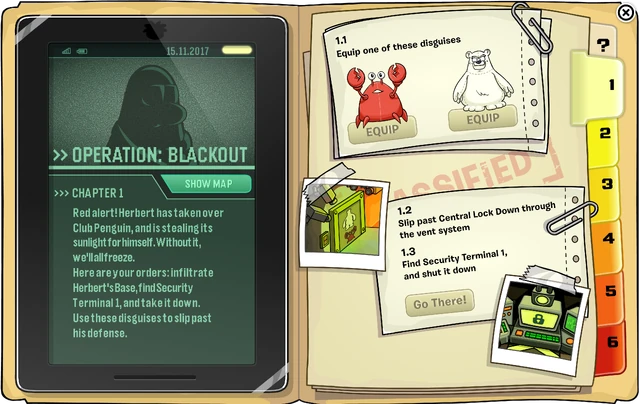
Now, find a way into Central Lock Down. To do this, enter Herbert's Paradise from the Ski Village.

You can get into Central Lock Down by going through Herbert's Paradise, and going through the door with the green light above it, next to the Herbert statue.

You should now be in Central Lock Down. Fool the security cameras into thinking that you are either Herbert or Klutzy by going up to the door marked with Herbert and Klutzy's outline.

The security cameras will be disabled, and you can crawl through the vents in Herbert's Paradise, which you can see in the picture above.
You are now in Sector 1.

Go up to the first Security Terminal, and after confirming that you would like to disable it, you will be taken to a game where you have to slide blocks to make room for the key. To slide the blocks, use your mouse to drag them where you want them to go.

- Move the block on the far right down to the empty space below it
- Then slide the key across the screen to complete the puzzle
You can now go onto Mission 2!
Mission 2
Equip the Grappling Hook by clicking on the "Equip" bar below it. Make sure you're wearing it while you complete this mission!

Now, click on the second Security Terminal, and confirm that you want to disable it. This puzzle has the same objective as the last one.

1. Slide the block on the second row from the bottom to the left.
2. Slide the vertical block downwards.
3. Slide the key across to complete the puzzle.
Next up, Mission 3!
Mission 3
Equip the Plasma Laser by clicking on the "Equip" bar below it, and make sure you're wearing it while you do this mission.
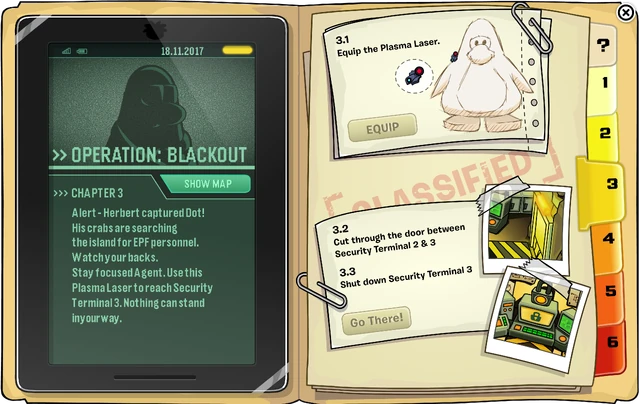
Click on the yellow door, and your Plasma Laser will cut the door down.
Click on it again, and you will find yourself in this room:

OH NO!!! Both Gary and Dot are frozen! This is not good!

Continue along the shaft, and you will find yourself in Sector 2.


- Move the block in the third grid from the bottom row up one block
- Move the block on the right of the bottom row to the left of the bottom row
- Move the block on the right of the top row down to the bottom row
- Slide the key across into the lock.
Onwards to Mission 4!
Mission 4
Equip the Deflection Vest by clicking on the "Equip" bar below it, and remember: Make sure you're wearing it!

Click on the orange lasers to pass through them, and you will find yourself in the next room. Now click the fourth Security Terminal.
This puzzle is a lot more complicated than the last three, but it can still be done.

- Move the block halfway on the left up to the grid above
- Move the block underneath the key down
- Move the block on the right column all the way to the left column
- Move the vertical block on the top row all the way down to the bottom row
- Slide the key into the slot!
As per your request, Mission 5!
Mission 5
The next security terminal is protected by a smoke screen, so equip the Smoke Goggles by clicking on the "Equip" bar below them.

Click on the smoke screen to pass through it, and you will find yourself in a room full of barrels of cream soda. What would Herbert want with this much cream soda?
Click on the fifth and final Security Terminal to start the puzzle.

- Slide the key across one block
- Slide the horizontal block on the same row as the key across one
- Move the vertical block on the left column up
- Move the block on the bottom row left
- Move the other block on the bottom row left
- Move the block on the right column down
- Slide the key into the slot
You have now disabled the big door in Central Lock Down!

Unfortunately, you will need to wear something on your feet to cross the lava pit. And that's where Mission 6 comes in!
Mission 6
Click the "Equip" bar below the Anti-Lava Boots, and make sure you're wearing them while you complete this mission.
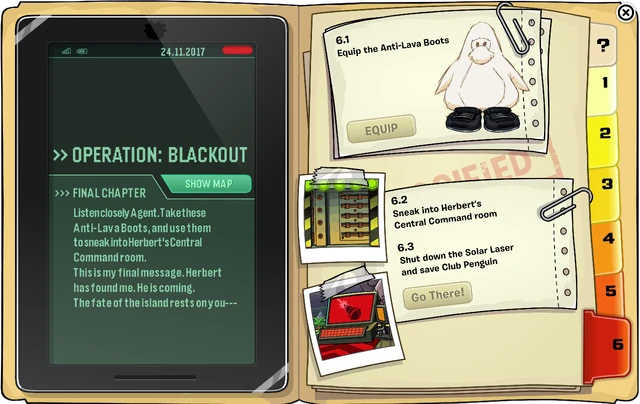
Click on the big door in Central Lock Down, and you will find yourself in Herbert HQ.
.png/revision/latest/scale-to-width-down/640?cb=20171122234856)
WHAT?! The Director's been frozen now! We must free him/her!
Click on the big Security Terminal to shut down the Solar Laser and save Club Penguin!

This is the big one - the hardest puzzle of all, but it can still be done.

- Slide the top block to the right
- Move the tall vertical block up
- Do the same with the short vertical block
- Slide the long horizontal block to the left
- Slide the short horizontal block above it to the left
- Slide the long horizontal block in front of the key downwards
- Do the same with the long horizontal block covering the lock
- Slide the key into the slot
Once you've successfully shut down the Solar Laser, you will get this screen.

Click "OK", and you will be able to see the final ending video showing Herbert having a meltdown, the penguins noticing that the sunlight is back and even the Director's secret identity being revealed to us!

You have now successfully completed Operation: Blackout!
No comments:
Post a Comment
Please complete this form to comment: